Using Gem Table to Merge Cells in OneNote
Gem Table primarily provide OneNote with the ability to merge cells.
To compensate for the inability of the OneNote native table to merge cells.
Let's use merged cells feature of Gem Table to create a table in this demonstration.
Steps:
In this demo we used the following features of the Gem Table:
You can use this feature to determine whether the cursor is located in a cell of a Gem Table.
Due to OneNote restrictions, sometimes the cursor is located in a location that is not necessarily the cell of the Gem Table. Use this feature to determine if it is a cell of a Gem Table.
If the cursor is not located in a Gem cell, you can select the cell by ordering another Gem cell and then return back to select the cell.
To compensate for the inability of the OneNote native table to merge cells.
Let's use merged cells feature of Gem Table to create a table in this demonstration.
Merged Cells of Gem Table
Steps:
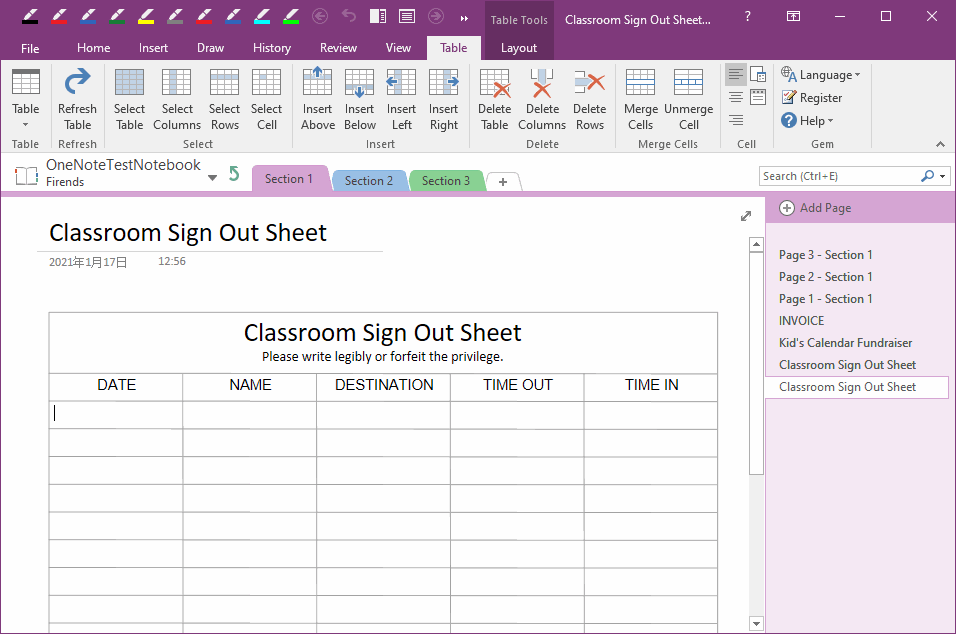
- At first, click “Table” tab -> Table -> 5x20, it will create a Gem Table with 5 columns and 20 rows.
- Then, select the first row, and click “Merge Cells” feature to merge first row.
- Then, paste "Classroom Sign Out Sheet, Please write legibly or forfeit the privilege.”
- The text beyond the borders of cell.
- Click “Refresh Table” feature to redraw the Gem Table to fit the text.
The Gem Table Features Used in This Demo
In this demo we used the following features of the Gem Table:
- Table: add a 5x20 Gem Table.
-
Refresh Table: When you edit or modify content in a Gem Table, the content may exceed the cell border boundaries.
Use this feature to adjust the table and redraw table. -
Merge Cells: Merge the selected cells.
Note: this feature only works for cells on the side, not the middle cells
Extra Feature:
Cell Properties: Display the cell address.You can use this feature to determine whether the cursor is located in a cell of a Gem Table.
Due to OneNote restrictions, sometimes the cursor is located in a location that is not necessarily the cell of the Gem Table. Use this feature to determine if it is a cell of a Gem Table.
If the cursor is not located in a Gem cell, you can select the cell by ordering another Gem cell and then return back to select the cell.
Demonstration